by ThinkCode | Nov 9, 2016 | Wordpress
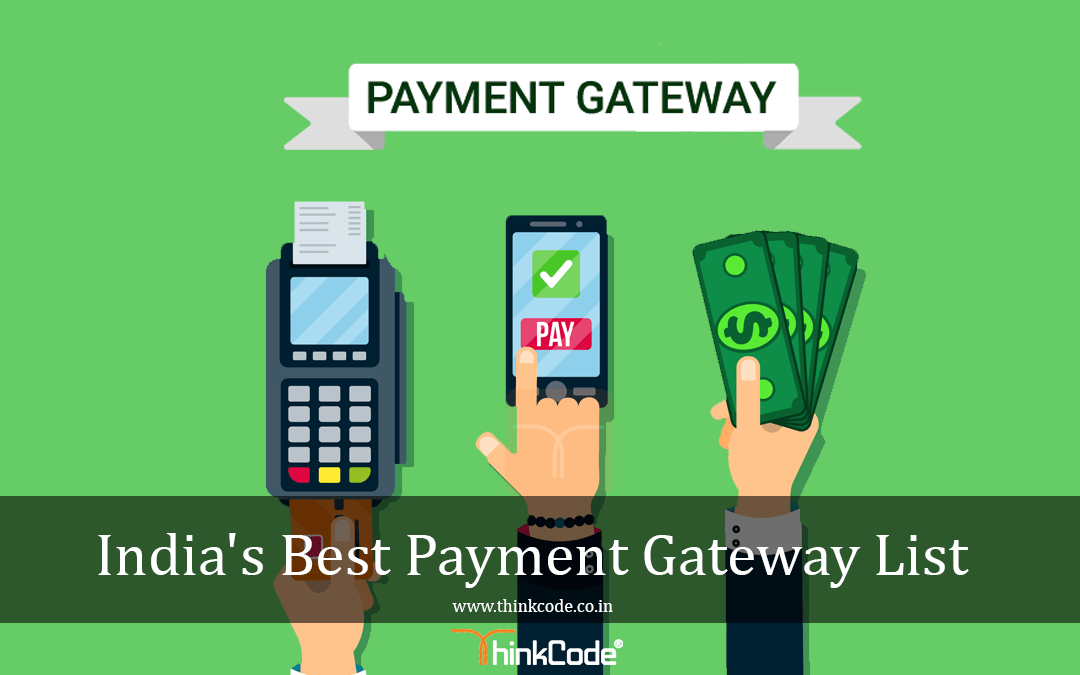
Top list of Payment Gateways in India. Learn about Payment Gateway which works best to collect payments online. List of payment gateway providers in India.
Here we have listed top companies in India which provide payment gateway and Merchant Account.
Before jump directly to a list of payment gateways provider list let’s learn something about why to know more about this list?
Choosing a payment gateway can be vastly difficult because you require a secure, quick, diverse and most reliable gateway to get the best out of your service. In business, different businesses have different needs in terms of the gateway service that suits them best. If your business handles a large amount of daily transactions then the facility your business would require is very different from those who handle a lesser volume.
So, what you need to consider while choosing Payment Gateways In India?
- Security & Trust
- Reliability
- Good Rates
- Diversity
- Superior User Experience
- Easy Integration
- Multiple Payment Options (Credit/Debit Cards, Netbanking, Mobile Wallets, etc)
Let’s look into list of Payment Gateways in India
- CCAvenue
- EBS Payment Gateway
- Citrus Pay
- DirecPay
- Atom Payment Gateway
- Zaakpay Payment Gateway
- PayUmoney
- HDFC Payment Gateway Services
- ICICI Payseal
- PayUbiz
- Whizpay
- Razorpay
Lets start one by one from this list of Payment Gateways In India
This is a leading Payment Gateway Service Provider in India. CCAvenue accept and validate Internet payments via Credit Card, Debit Card, Net banking, ATM-cum-Debit Card, Mobile Payment and Cash Card modes from the end customers in real-time. CCAvenue provide a secure link between your website, various issuing institutions, acquiring Banks and the payment gateway providers.
E-Billing Solutions established in the year 2005 is having headquartered in Mumbai. EBS provide online purchases from a merchant’s website and helps them to collect payment from the end customers through the various method like net banking, credit, and debit cards etc. EBS is a mediator that collect the online payment options offered by various banks, cash card brands and many other payment processors onto a single platform with least technical integration with merchant website.
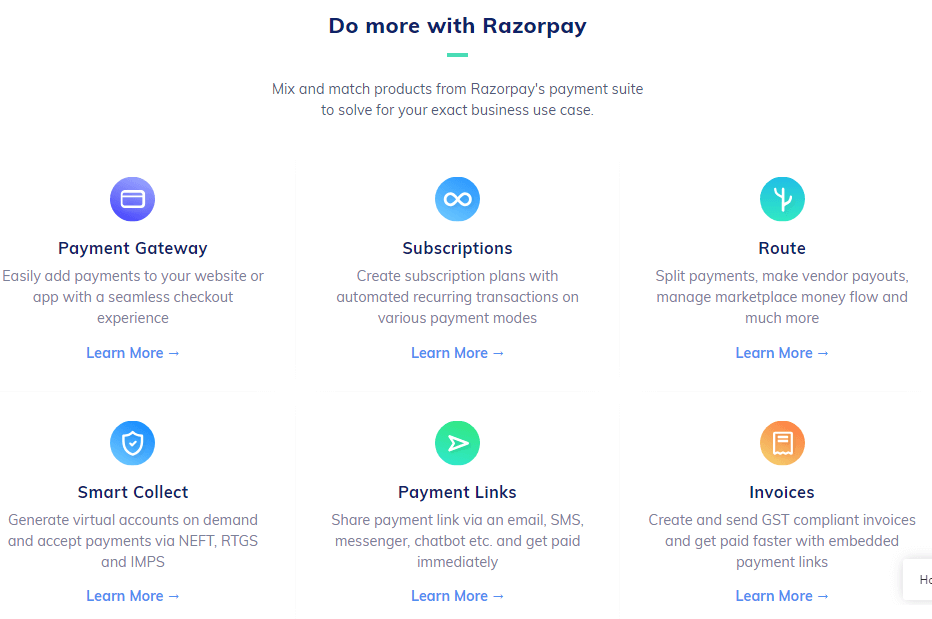
India’s best payment stack for developers, instant payments for businesses and seamless checkout for consumers. Payment gateway, mobile wallet, unique marketplace solution and more – for all payment needs.
Citrus Pay empowers users with a one-click checkout across merchants on all your favorite devices!
It helps web shops and online merchants to accept credit card and alternative payments over the internet. This is also one of the best in our list of payment gateways in India.
DirecPay is a combine online payment gateway solution for Indian merchants. It is one of the first Indian payment solutions providing a credit card payment gateway integrated with Debit Cards, Net Banking & Mobile payments together with a fast, reliable & secure passage for processing eCommerce payments.
Atom one of the popular payment gateways is atom tech payment gateway. Payment gateway is introduced by the financial technologies group enterprise. This secure online payment & accepts debit & credit cards, cash / prepaid cards. It allows WordPress user to use Atom payment gateway with the WooCommerce plugin.
Zaapkay is the best online payment gateway in India & it provides a platform Merchant Account which offers multiple electronic payment systems, online payment. It also has two products to offer 1. Webpay , 2. Mpay, making Zaakpay a complete online payments solutions provider. It helps webshops & online merchants to accept credit card and alternative payments over the internet.
Accept Cards, Netbanking, Wallets, EMI & UPI. Supports PHP, Shopify, WooCommerce, Android. Go Live Instantly. Developer Friendly API. Cards, UPI, Netbanking. No Setup Fees. GST Ready Payment Gateway. Online Onboarding Process.
Types: Credit Card, Debit Card, Netbanking, UPI.
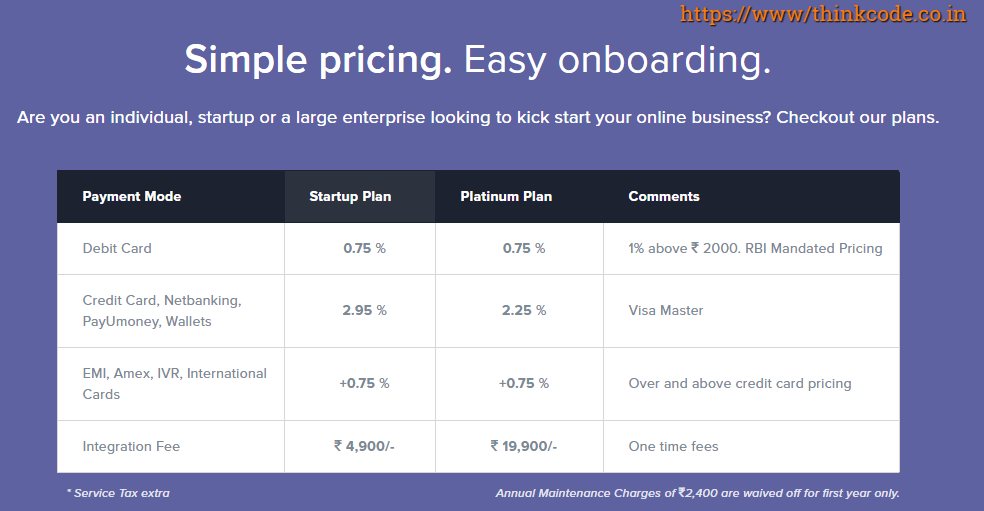
{ PayUmoney Payment Gateway | No Setup Fee, No Hidden Cost }
PayUmoney is best payment gateway company in India. It let your customers pay through Credit Cards, Debit Cards, Net Banking and more. All your transactions with PayUmoney are secured with 128 bit SSL encryption and two factor authentication. PayUmoney Wallet Available.
Charges : 2% per successful transaction* {Rs. 0 Setup Fee & Rs. 0 Annual maintenance fee}
This Payment Gateway provides a single platform to support multiple payment technologies this payment Gateway support VISA Card Debit Credit card.
HDFC bank provides two types of payment gateways for commercials:
- Credit & Debit Cards
- Netbanking
For more detail about it check out here
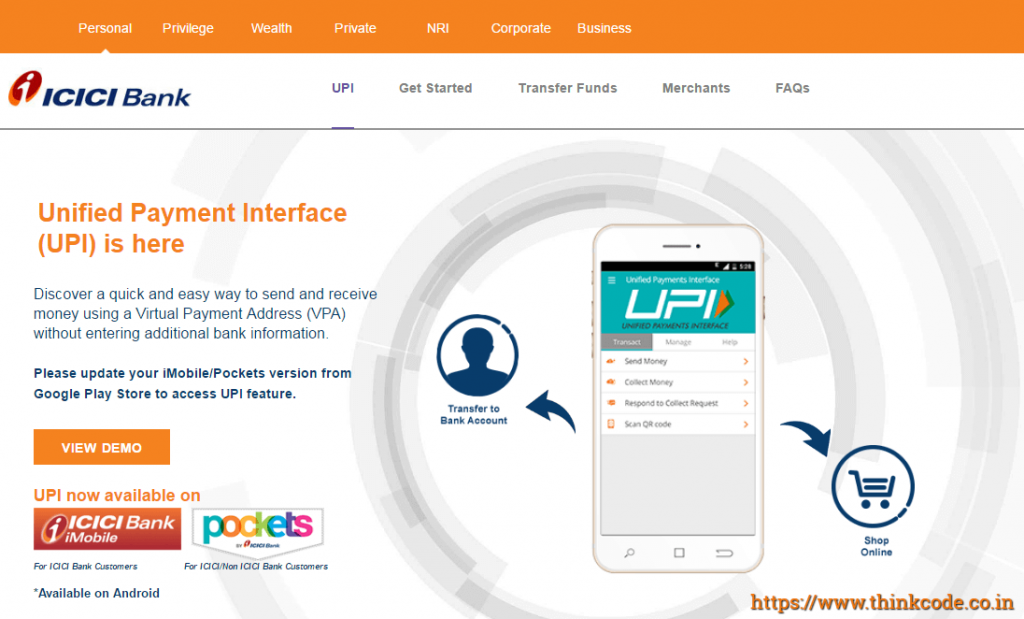
ICICI Payseal Payment Gateway provide 128-bit SSL encryption, an authenticate security technology protocol. It can process Visa & MasterCard Credit Cards issued around the globe. It’s has Verisign certification & Swift Transaction processing.
ICICI Bank, India’s largest private sector bank, and it announced the launch of UPI [Unified Payments Interface] on two of its customer facing mobile banking applications.
1.Pockets
2. iMobile
This is the simplest mode of making payments for all customers, including non-ICICI Bank customers.
It is the best Payment gateway provider in India. Earlier known as PayU, it enables merchants to collect payments online. It offers high success rates & detailed analytics. As per indiatimes.com “Leading payment gateway aggregator, PayUBiz hits a total processed value (TPV) of half a billion dollar per month.”
This Payment gateway enables internet merchants to accept online payments via credit card & e-check. This WhizPay is a modular multipurpose, PCI-certified Gateway. This is an online Payment solution tailored to the requirement of Indian Merchants.
This Payment gateway Support hundreds of payment methods. Its specialty is it Start and end payments on the same page. It supports UPI Bharat QR All major debit and credit cards 50+ Net-banking Options Mobile Wallets.
Razorpay Payment Gateway ThinkCode
Free & Easy Application Process.100+ Payment Modes, Secure Gateway, Simple Integration. Accept Cards, Netbanking, Wallets, EMI & UPI. Supports PHP, Android, Shopify, WooCommerce. Easy Integration. Dashboard Reporting.
Services: Customize Your Checkout, Accept UPI & EMI Payments, Autofill OTP on Mobile, Fraud Protection.
We hope this Top list of Payment Gateways in India will help you to learn more about India Payment Gateways options available & also it helps to choose the right one for your business need.
We try to make this article to give you answers of these questions: which is the best payment gateway? list of payment gateway providers in India? best payment gateway in India for small business? payment gateway providers? cheapest payment gateway India? top 10 payment gateways? payment gateway India no setup fee?
by ThinkCode | Oct 19, 2015 | Wordpress
The parent theme plays an important role like it acts as a base for the child.
Main Functions of parents and child themes?
• Parent theme: Parents theme contains the code that creates the function & features of your wordpress site.
• Child theme: Child theme contains the styles and image that form the base for your site’s design.
Features:
• This parent/child framework protects the theme
• In the earlier phase, if you customized a theme and now you want went to upgrade to a newer version you would need to get all your changes in the customized theme & then recreate them in the newer version, otherwise you would lose all your changes when you upgrade.
• With the parent/child framework all customizations are stored in the child theme
• Your customizations are safe from future upgrades because you have only upgrade the parent theme, which you never goes to edit, while the customizations are protected in your child theme which you don’t upgrade.
How to Use Parent and Child Themes?
When you install a theme that uses a parent or child framework you upload both parent and child theme in same directory to /wp-content/themes/ but only activate the Child theme .
For example:
• When you install Thinkcode theme you upload the Thinkcode and Thinkcode-child folder to /wp-content/themes and then only activate the ‘Thinkcode-child’ theme.
Modifying Files from the Parent Theme Folder to Child Theme Folder
• You should never edit files in Parent theme, only you can download a copy of the file which you want to modify onto your computer, make the necessary changes, and then upload it into your child theme folder.
• Any files that are uploaded to the child theme automatically override in the parent theme as anything in the child takes first priority over the parent.
• This technique can be used for folders within the parent theme, but you must re-create the as it is folder structure in your child theme that exists in the parent theme folder.
by ThinkCode | Oct 12, 2015 | Wordpress
WordPress Child Theme means?
A child theme is simply a theme that inherits the functionality and looks of another theme or the parent themes.
A WordPress child theme means a WordPress theme that inherits its functionality from another WordPress theme or the parent theme. Child themes are often used when you want to customize an existing WordPress theme without losing the ability to upgrade that theme.
Designers and developers use child themes to speed up their development.
• If we create a child theme we will not need to create a new theme from scratch. Which help to increase the speed of development and reduction in time to complete task.
• You can avoid irreversibly damaging your site by using a WordPress child theme.
• A child theme automatically inherits the parent theme’s features, styles, files and templates.
• There are a lot of free theme frameworks available which give you a wide range of functionality will not need too much customization in our child themes.
• A child theme built on a theme framework allows a great deal of flexibility without writing many lines code.
• You forget to code for something, then there is always the parent theme’s functionality available as the fallback option.
• You will get benefit from updates to the parent theme without having to recode all your child themes.
Disadvantages of Using a Child Theme
• Disadvantage of using child themes is the time we need to invest to learn about the parent theme.
• You need to learn hooks and other functions that are used by parent themes or framework.

by ThinkCode | Sep 25, 2015 | Wordpress
As per the statistics on internet usage behavior reveal a very interesting fact — more than 60 percent of smartphone users throughout the world of internet use the internet through their mobile devices to get relevant information quickly, especially when they are away from their 1 computers . Around 40 percent of users browse the internet while traveling.
Possible Solutions for Device friendly Web Design
To address this challenge, there are two recommended way for UX designers:
- Responsive Website Design (RWD)
- Adaptive Website Design (AWD)
Responsive Web Design (RWD) is an approach in which a site is designed to provide a best viewing experience across all wide range of devices, from desktop computer monitors to mobile phones. Responsive Website Design has been widely adopted by organizations across the globe, but it is not the only solution for designing sites that must work across various media. Adaptive Web Design, for instance, is an approach for device friendly design. In other words, it comprises specific designs suited for specific media, such as mobile, desktops, laptops device and so on.
The preference to adopt RWD or AWD will depend on the business situation.
Responsive Web Design
The Responsive Web Design approach is adopted to provide a best viewing experience, which consist of easy reading and navigation with minimum resizing & panning. In other words, it is an approach that enables website design and development to respond to the users behavior and environment, based on screen size, platform, and orientation.
RWD comprises flexible grids, layouts & images, and makes intelligent use of Cascading Style Sheet media queries to adjust screen resolution & automatically resize images. The intention is to build a website that is resolution and device-independent.
Tools for Responsive Web Design
The main tools for Responsive Web Design are HTML5, CSS3, and JS, and jQuery.
HTML5: It is the most recent version of HTML, with features that provide device independence and error handling, and reduce the need for external plug-ins. HTML5 includes the features of HTML4, XHTML, XHTML1 and DOM2HTML. It’s a development framework with CSS3 and JS, along with a number of new elements, attributes, 2D & 3D graphics, video, audio elements, local storage.
CSS3: It is the latest version of the Cascading Style Sheet standard and is completely backwards-compatible with all earlier versions. CSS3 features such as orientation, device-width, min-device width, border-radius, opacity, box-shadow & text-shadow, it help create beautiful web pages which improve the user experience.
JavaScript and jquery: JS named css3-mediaqueries.js can help in the cases where browser versions and devices do not support CSS3 media queries.
The new intranet design should enable users to:
- Know who the go to experts are in the business
- Keep up with the latest updates within the organization
- Share information about best practices with employees
- Ensure that essential documents are updated
- Access important policies while on the road
- Act on pending requests round the clock
- Access the site through any device
A few best practices that should be followed to make a responsive
- Create a base site prototype with the help of a standard HTML editor & then use a responsive framework like Twitter Bootstrap help to convert the prototype into a responsive.
- Wherever possible, use the grid system to save time instead of building your own grid systems.
- Replace all pixels with percentages in the layout design.
- Use CSS3 and Media Queries richly for styling output.
- Avoid table-based layout design and browser-based HTML, JavaScript, and font tags.
- Create device channels based on matching User Agent.
- Create a set of image renditions that each image will automatically follow.
Conclusion:
Making a design responsive is relatively easy and more productive than developing code for every device available. With Responsive Web Design, we can create custom solutions for diverse set of users on a wide range of devices.

by ThinkCode | Sep 18, 2015 | Wordpress
Updating WordPress site with the latest version is always good.The WordPress upgrade system is vastly improved. But while updating your WordPress website you have taken care of your website database files.
First and important point under updating that you should do this process when your website has lower traffic. Next, start working through the steps below.
Depending on what you need to update, some of these steps may need to be omitted, but here is the proper sequence of update events:
Kindly refer the below Steps while updating WordPress
1: Back Your Site Up
Take a backup of your WordPress website if anything’s goes wrong then you have backup to restore old site. Back up the database of your site. You can do this either via PHPMyAdmin or with our new dashboard tool.
Back up your themes and plugins. It is worth noting that backing up the uploads folder (inside wp-content), which can often take a long time, is not necessary before upgrading. We have backups of it on hand, plus nothing in a WordPress update is going to affect your uploads.
2: Turn Caching Off
Deactivate your caching plugin. In most cases this will be W3 Total Cache.
3: Update Your Plugins and Theme
Whiling updating your website please take note on updating plugin and theme framework. Because some plugin are not supports newer version of WordPress please take care of this.
4: Now Update WordPress
Now update WordPress itself! Just click on the automatic upgrade button and let WordPress do its thing.
5: Activate installed Caching Plugin
Reactivate your caching plugin and clear out/purge the cache.
Note: After all these steps then check your website Take a minute to look over your site and visit a pages and posts.